The Payroll Module is designed to help an organization manage the payroll of its employees. The Payroll module is divided into nine sub-modules:
- Biometric Attendance
- Bulk Attendance
- Bulk Payslip
- Payslip List
- Payslip Approval
- Bulk Payout
- Payout
- Pay Structure
- Settings

1. Biometric Attendance
The Biometric Attendance sub-module allows the company to manage the attendance logs of its employees.The user has to upload an Excel file containing the employee numbers and their In and Out times for each day.
The uploaded file must conform to the format given. This format can be downloaded by clicking on the Download Biometric Attendance Format hyperlink.


2. Bulk Attendance
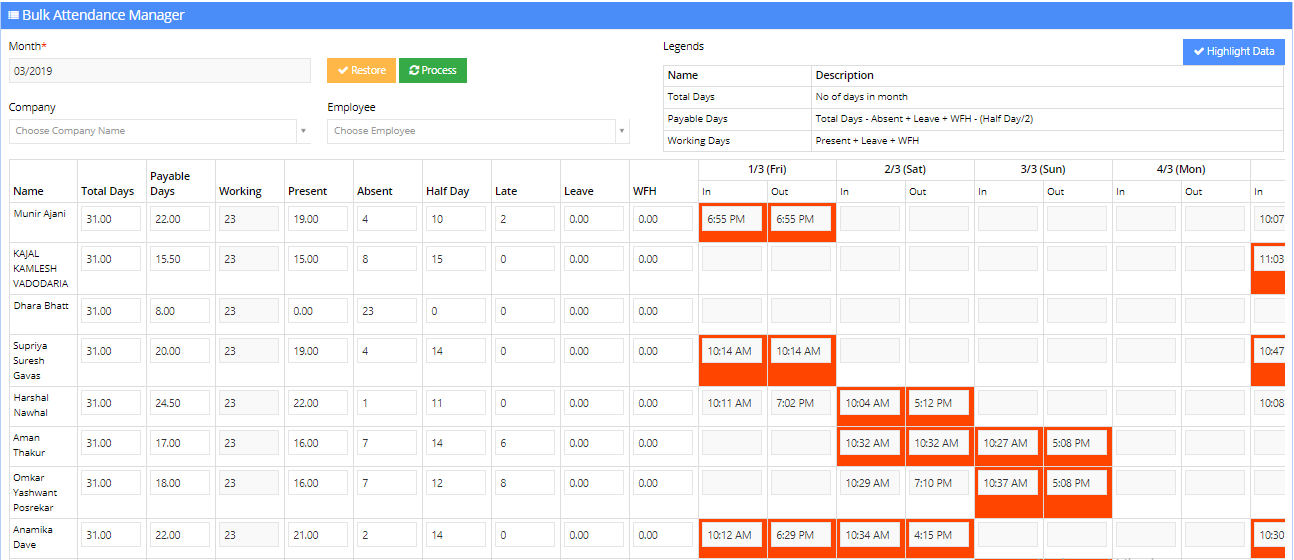
The user first selects the month and year for which the attendance of the employees is to be viewed.

- Payable Days
- Present
- Absent
- Half Days
- Late Marks
- Leaves
- Work From Home
The formulae calculating these categories are stated in the legend which is located in the top right corner of the page.

Highlight Data:
The user can highlight the records where an employee arrived late or left earlier than the designated time.This is achieved by pressing the Highlight Data button.

Restore:
The user can press the Restore button to revert any changes made to the data. This will display to the user the data that existed before the changes were made.
Process:
The user can press the Process button to process the late marks of every employee.
Filters:
The user can filter data according to the Company Name or view the data of an individual employee by selecting the employee from the Employee dropdown.
3. Bulk Payslip
The Bulk Payslip sub-module helps a company generate payslips for its employees in a single go.This makes the Payslip generation process easier as multiple payslips can be generated at once instead of generating them one by one for each employee. This is particularly helpful when the number of employees in an organization is large.
Once the user clicks on Bulk Payslip in the sidebar, the user is prompted to select the month for which the payslips are to be generated.

The user can view the attendance details of each employee along with their gross salary and amount to be paid.
The user can search for a specific record using the search bar or vary the number of records per page using the dropdown located in the top left corner of the screen.

Now, press the Save button to generate payslips for the selected employees.

4. Payslip List
This sub-module helps the user manage the payslips of employees.
Once the user clicks on Payslip List, all the existing payslips are displayed to the user.
The user can change the number of records per page and search for a particular record using the search bar.

4.1 Add New
To generate a new payslip for an employee, click on the Add New button in the top right corner of the page.

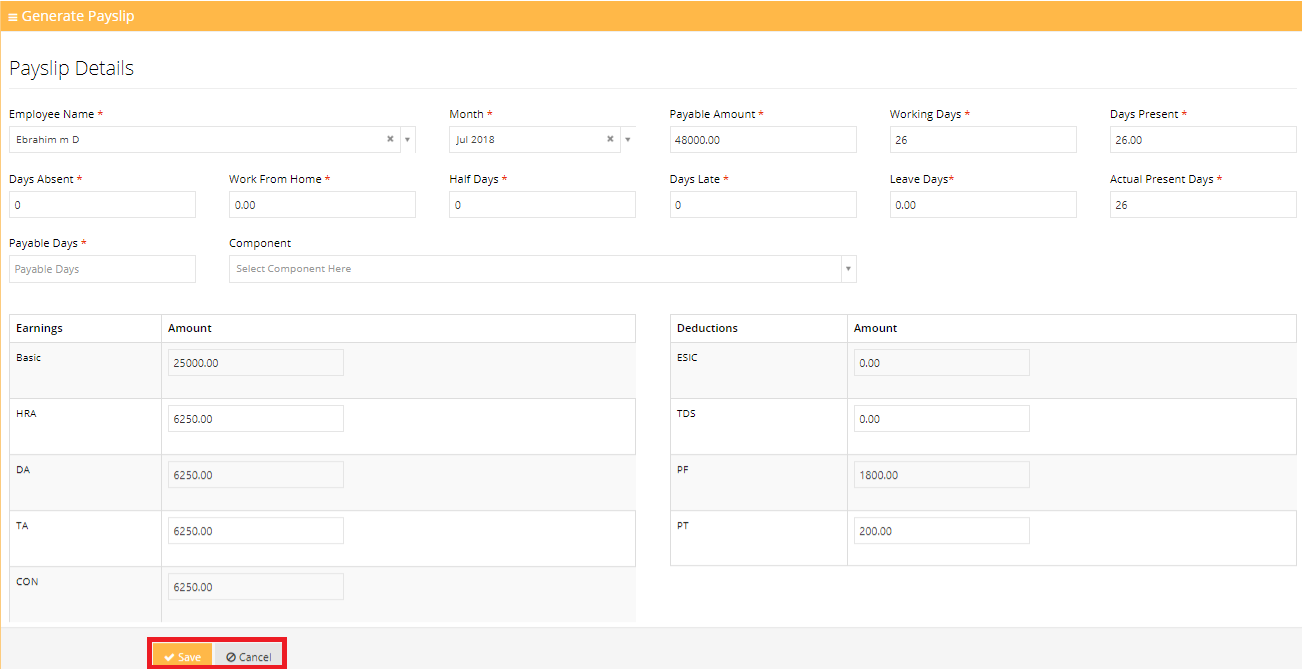
After clicking on the Add New button, the user is displayed a form to fill in order to generate a new payslip.
Fields marked with an asterisk(*) are required and can't be left empty.
After the form, is filled it is saved by pressing the Save button. Press Cancel to discard the changes.

4.2 Payslip View
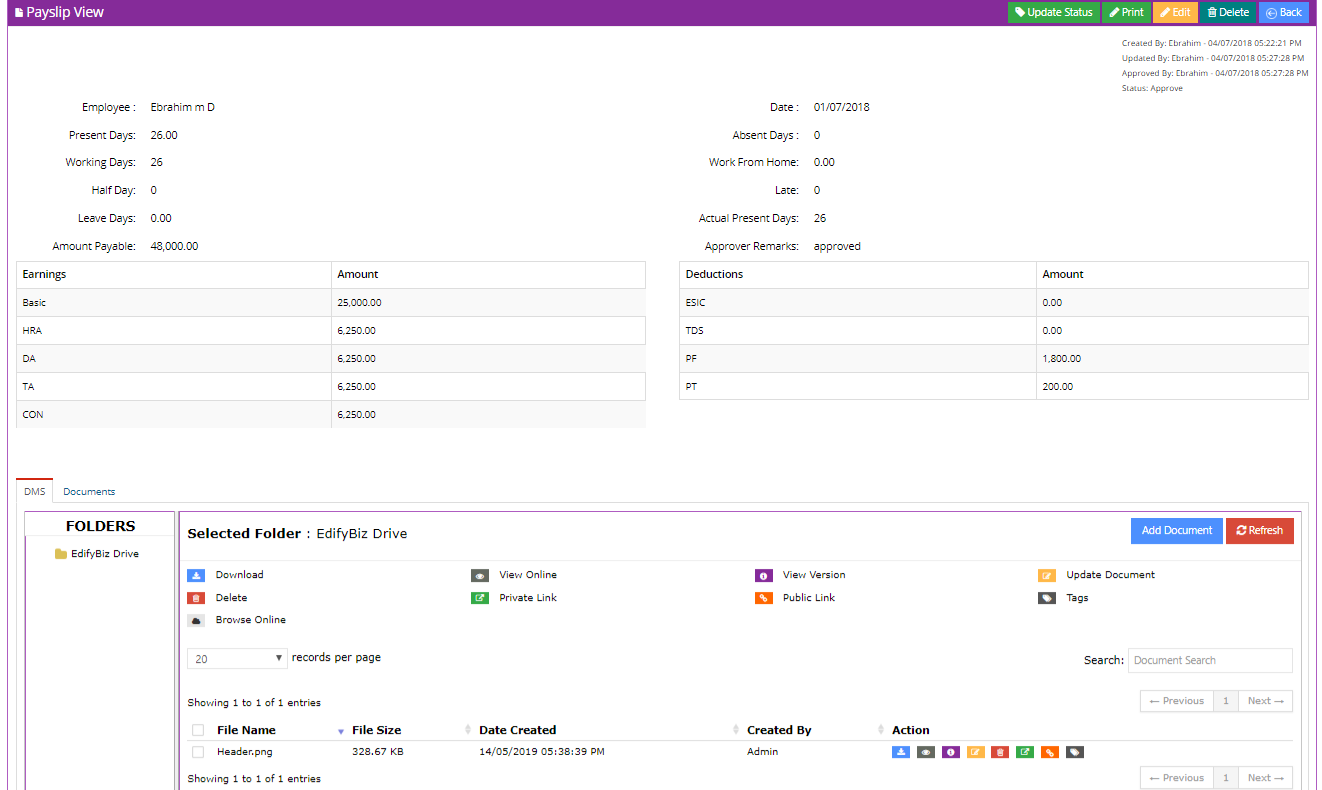
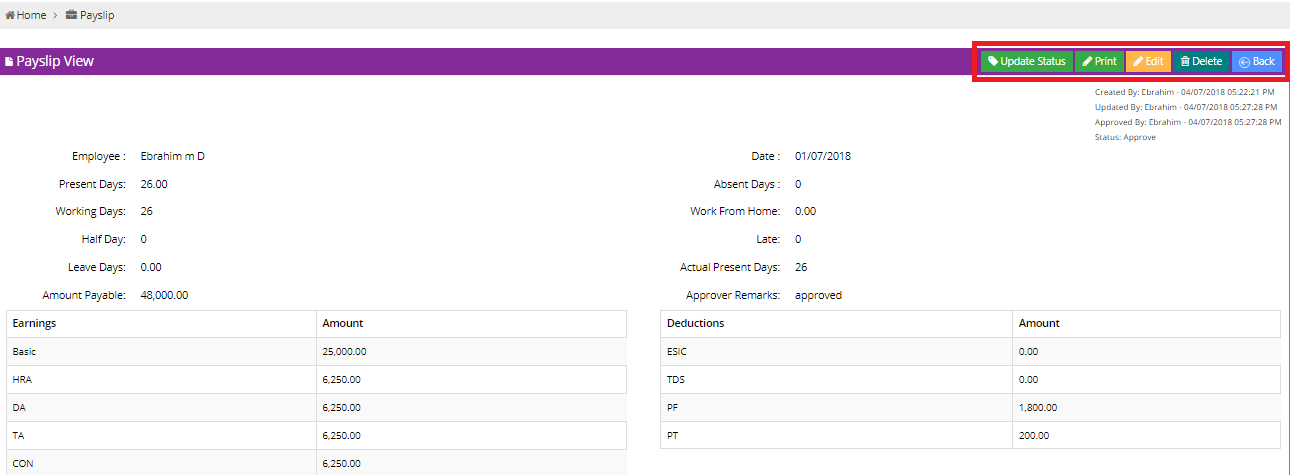
The Payslip View for an employee is displayed when the user clicks on the Payslip Number of an employee in the Payslip Manager.

The payslip view displays the details of the employee along with all applicable payroll components (earnings and deductions). The user can also attach additional documents via the DMS tab and print the payslip according to set templates using the Documents tab. Various other actions can be taken on a payslip. These are explained later in this section.
4.2.1 Actions
The following actions can be taken on a payslip:
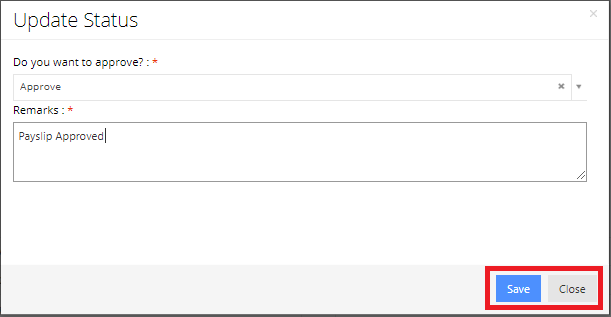
- Update Status: The user can set a status to a payslip. This is to indicate whether the payslip is approved or not. The user can also add additional remarks to the status. Press the Save button to save the new status. Press the Close button to close the dialog box.
- Print: Press the print button in order to print a copy of the payslip.
- Edit: To edit the payslip, click on the Edit button. The user is prompted to enter a form. Once the form is filled, press the Save button to generate the new payslip or the Cancel button to discard the changes made to the payslip.
- Delete: To delete the payslip, click on the Delete button.
- To go back to the previous screen, press the Back button.
4.2.2 DMS
The user can attach additional documents to a payslip using Edifybiz's DMS functionality.
To add a new document, the user can click on the Add Document button and refresh the list of added documents by clicking on the Refresh button.
The user can navigate through different folders in the Folders column.
The details of a document include the File Name, the Size of the File, the Date of Creation and the user who created the document.
The actions that can be taken on a document include:
- Download: To download the document.
- View Online: This opens the document in a new tab.
- View Version: Allows the user to view previous versions of the document.
- Update Document: Allows the user to revise or update a document.
- Delete: Enables the user to delete a document.
- Private Link: This generates a link to the document. This document is password protected.
- Public Document: This generates a link to the document which can be viewed by anyone who posseses the link.
- Tags: This enables the user to add a tag to the document.

4.2.3 Documents
In this section, the user can upload and view different uploaded documents
The user can navigate through different folders in the Folders column on the left.
Once a folder is selected, the user can view the documents that exist in that folder.
The user can generate a link to the document by clicking on the Get Link button.
To get an overview of a document, the user can click on the name of the document.
To add a new document to the selected folder, the user can click on the Add New button.

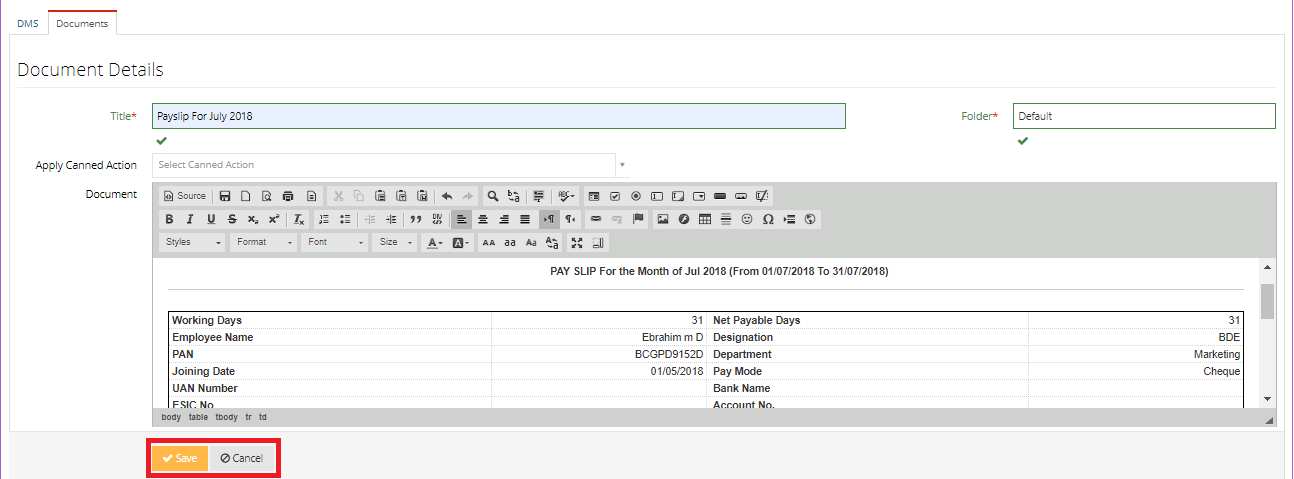
When the user clicks on the Add New button, the user is prompted to enter the document details. These details include the Document title, the Folder and Apply Canned Action.
Use Apply Canned Action to generate a payslip in accordance to a set template.
The user then is able to format the document using the CK Editor.
Upon finishing the above procedure, the user can press the Save button to save the document or cancel the document and go back to the previous screen by pressing the Cancel button.
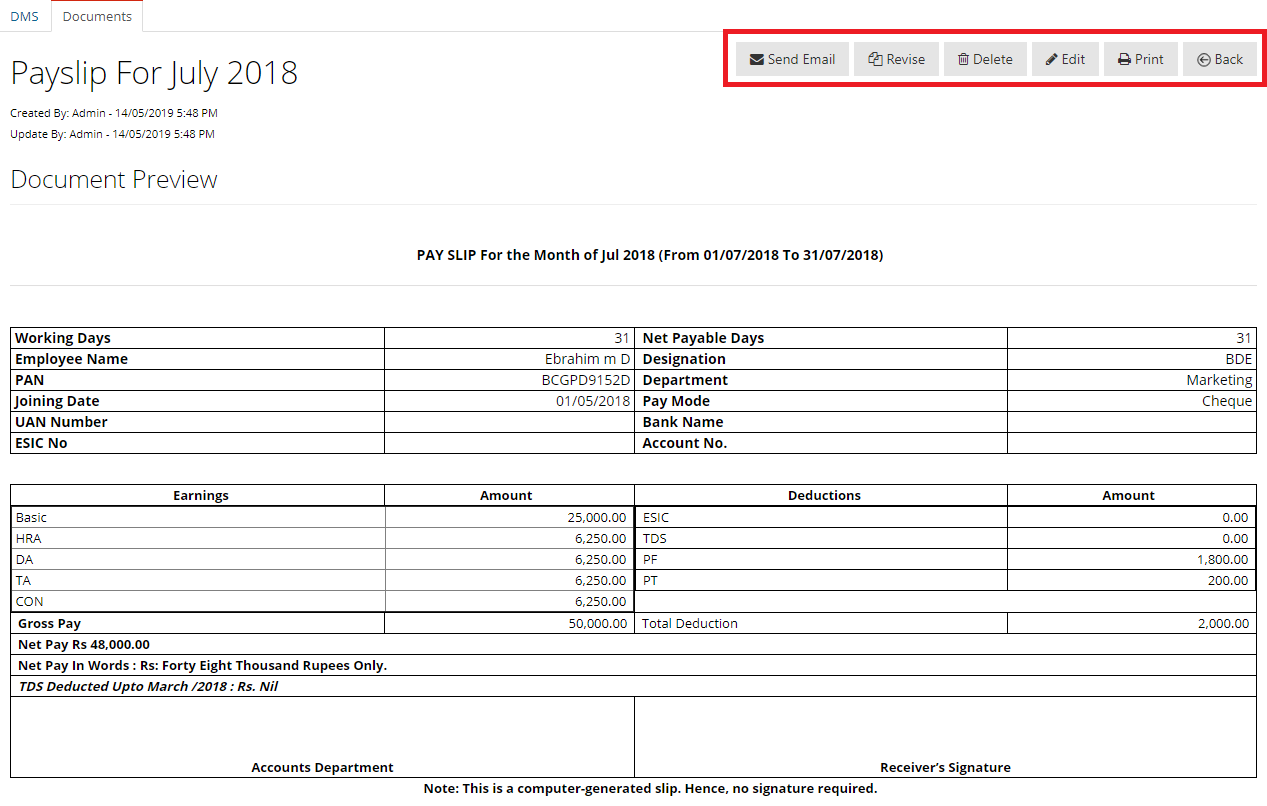
After clicking on the name of a document, the user can see a preview of the document
Various actions can be taken on the document. These include:
- Mail the document to someone else.
- Revise the document.
- Delete the document.
- Edit the document.
- Print the document.
5. Payslip Approval
This sub-module helps an organization approve or reject its employees' payslips.
Once payslips are generated, they appear in the pending approval tab. Here, the user can decide whether they are to be approved or rejected.
The user can also view payslips that have already been accepted or rejected.
The user can search for a specific record using the search bar or vary the number of records per page using the dropdown in the top left corner.
The lists have the following columns:
- Payslip Number: This column displays the unique number of the payslip.
- Name: This displays the name of the employee against whom the payslip was generated.
- Month & Year: This column displays the month and year for which the payslip was generated.
- Approved/Rejected By: This column displays the name of the user who approved/rejected the payslip.
- Approved/Rejected On: This column displays the date on which the payslip was approved/rejected.
- Amount: This displays the amount to be paid to employee for that payslip.
- Pending Approval
- Approved
- Rejected
5.1 Pending Approval
This tab shows the list of payslips that are yet to be approved and are awaiting approval.

5.1.1 Update Status
To update the status of a payslip, tick the checkbox corresponding to the payslips whose status is to be updated.Now the user clicks on the Update Status button.


5.2 Approved
This tab shows the list of payslips that have been approved previously.

5.2 Rejected
This tab shows the list of payslips that had been previously rejected.

6. Bulk Payout
7. Payout
This sub-module allows an organization manage its employees' payout individually.
Upon clicking on Payout, the user can view the Payout Manager window. This contains a listing of existing payslips along with the name of the employee, the month and year of the payslip along with the amount paid.
The user can look for a particular record using the search bar or vary the number of records per page using the dropdown in the top left corner of the screen.

7.1 Add New
To add new payout details, press the Add New button, located in the top right corner of the screen.
The following fields are to be filled by the user:
- Employee Name: In this field, the user selects the employee for whom the payout is to be generated
- Month: The user picks the month for which the payout is to be generated in this field.
- Payable Amount: The user can view the payable amount to the employee in this field. This field is automatically filled according to the employee name and month selected.
After entering the necessary details, press the Save button to generate the payout.
Press Cancel to go back to the listing without generating the new payout.

7.2 Payout View
To open the Payout View, click on a payslip number for which the view is to be opened.

7.2.1 Actions
The following actions can be taken on a record in the payout view:- Edit: To edit the payout details, press the Edit button.
The user is now displayed a form with fields containing already existing data.
After making necessary changes to the data, the user can press the Save button to confirm the changes to the payout.
Press Cancel to discard the changes and go back to the payout list.
- Delete: To delete the record, press the Delete button.

- Back: To go back to the Payout List, press the back button.

7.2.2 Tabs
The Payout View provides the user the following tabs in order to save additional information about a payout. These tabs are listed below:- Product
- DMS
- Documents
Product
The user can enter the payment details against the payout in this tab.To add a new record, press the Add New button. After entering necessary details, press the Save button to add the details.


DMS
The user can attach additional documents to a payout entry using Edifybiz's DMS functionality.
To add a new document, the user can click on the Add Document button and refresh the list of added documents by clicking on the Refresh button.
The user can navigate through different folders in the Folders column.
The details of a document include the File Name, the Size of the File, the Date of Creation and the user who created the document.
The actions that can be taken on a document include:
- Download: To download the document.
- View Online: This opens the document in a new tab.
- View Version: Allows the user to view previous versions of the document.
- Update Document: Allows the user to revise or update a document.
- Delete: Enables the user to delete a document.
- Private Link: This generates a link to the document. This document is password protected.
- Public Document: This generates a link to the document which can be viewed by anyone who posseses the link.
- Tags: This enables the user to add a tag to the document.

Documents
In this section, the user can upload and view different uploaded documents against a payout entry.
The user can navigate through different folders in the Folders column on the left.
Once a folder is selected, the user can view the documents that exist in that folder.
The user can generate a link to the document by clicking on the Get Link button.
To get an overview of a document, the user can click on the name of the document.
To add a new document to the selected folder, the user can click on the Add New button.

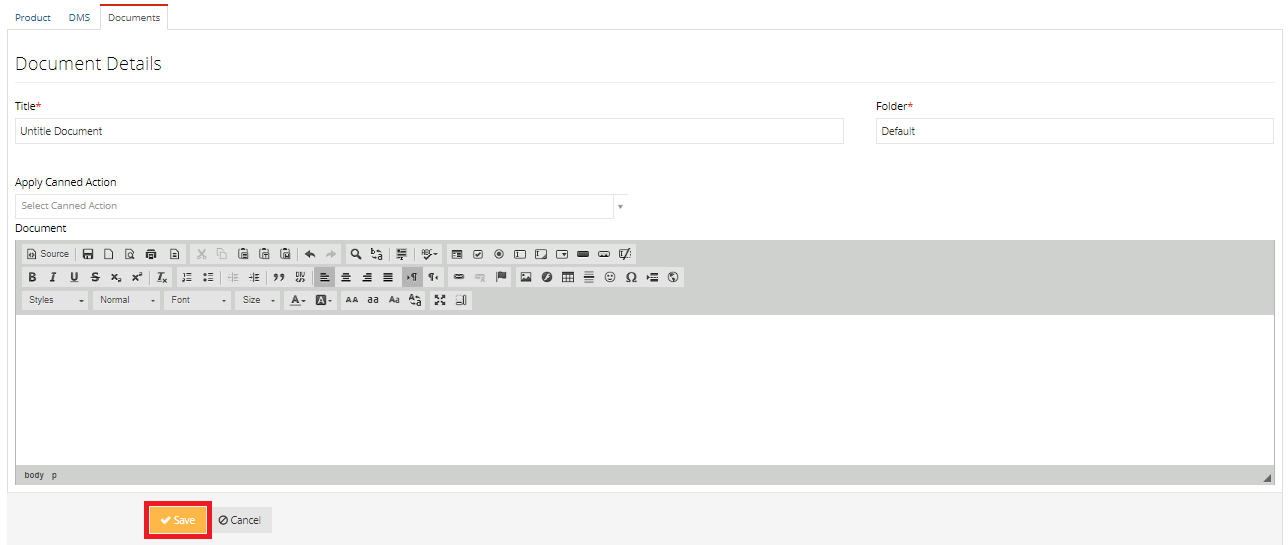
When the user clicks on the Add New button, the user is prompted to enter the document details. These details include the Document title, the Folder and Apply Canned Action.
Use Apply Canned Action to generate a document in accordance to a set template.
The user then is able to format the document using the CK Editor.
Upon finishing the above procedure, the user can press the Save button to save the document or cancel the document and go back to the previous screen by pressing the Cancel button.
After clicking on the name of a document, the user can see a preview of the document
Various actions can be taken on the document. These include:
- Mail the document to someone else.
- Revise the document.
- Delete the document.
- Edit the document.
- Print the document.

8. Pay Structure
This sub-module helps the user manage the pay structure of an employee.
Once the user clicks on Pay Structure, the list of employees and their total pay is displayed to the user.
The user can change the number of records per page and search for a particular record using the search bar.

8.1 Add New
To add a new pay structure for an employee, click on the Add New button in the top right corner of the page.

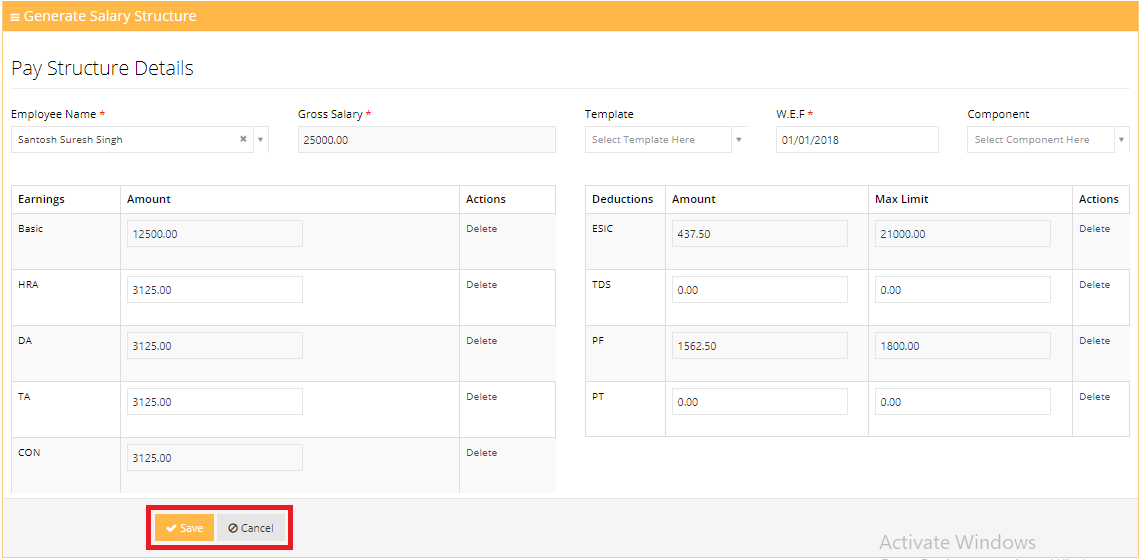
After clicking on the Add New button, the user is displayed a form to fill to generate a new salary structure.
The user is prompted to fill the following fields:
- Employee Name: This field requires the name of the employee
- Gross Salary: This field represents the Gross Salary of the employee. This field is automatically filled according to the entered salary of the employee.
- Template: The user can select from the already created templates in the dropdown. Upon selecting a template, all the applicable payroll components and their amounts can be seen. They are divided into earnings and deductions
- W.E.F: This field shows the date from which the pay structure is effective.
- Component: This field displays a dropdown containing all the payroll components. To add a new payroll component to the list of applicable components, select it from the dropdown.
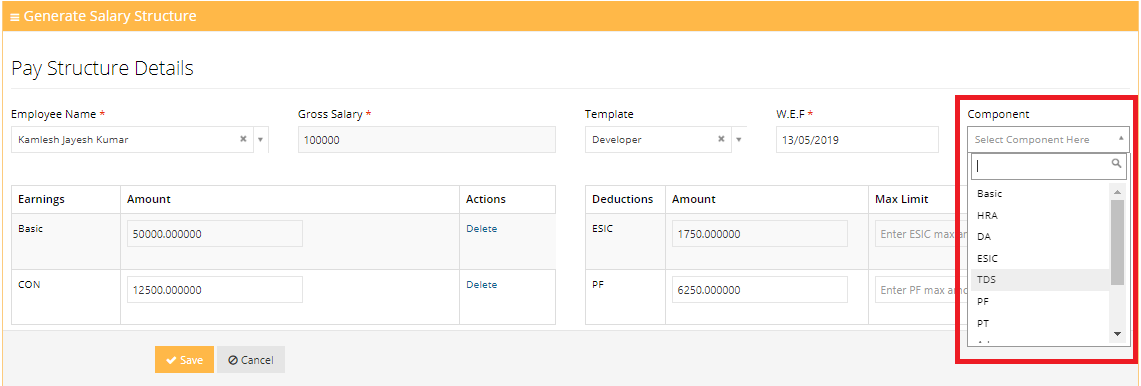
Fields marked with an asterisk(*) are required and can't be left empty.
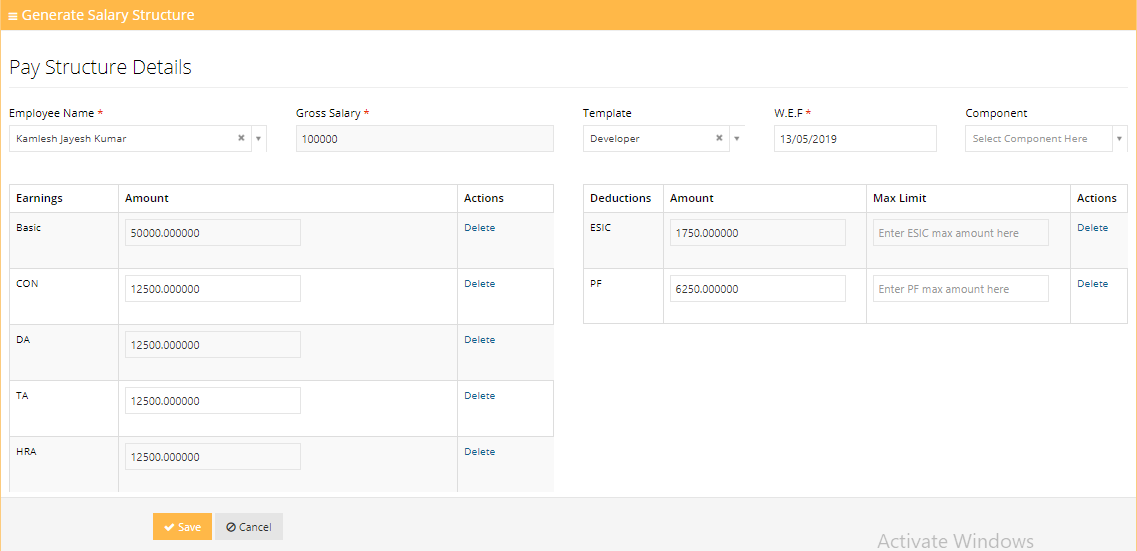
To delete a component, press the Delete button next to the particular component.

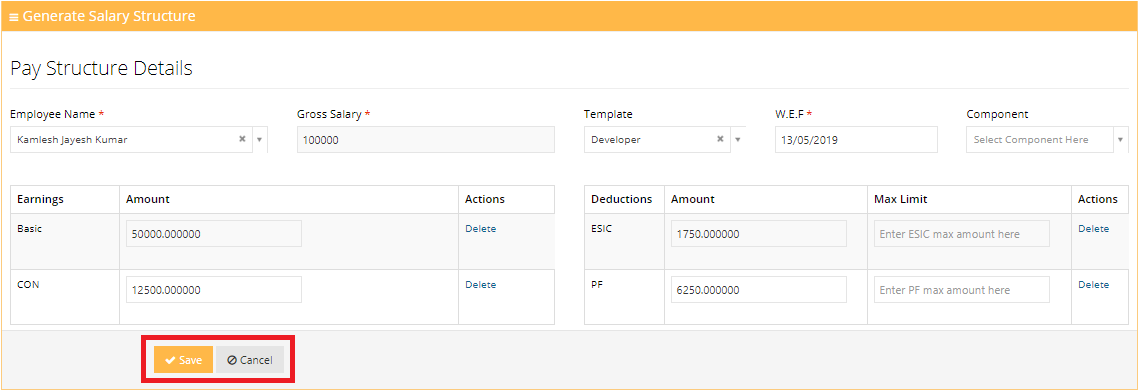
After finishing filling the form, press Save to save the changes or press Cancel to cancel this pay structure.
8.2 Pay Structure View
The Pay Structure View for an employee is displayed when the user clicks on the name of an employee in the Pay Structure Manager.

All the applicable payroll components are displayed to the user along with the name, department, designation and the effective date of the structure. The components are divided into two categories, earnings and deductions. The amount corresponding to the components is also displayed.
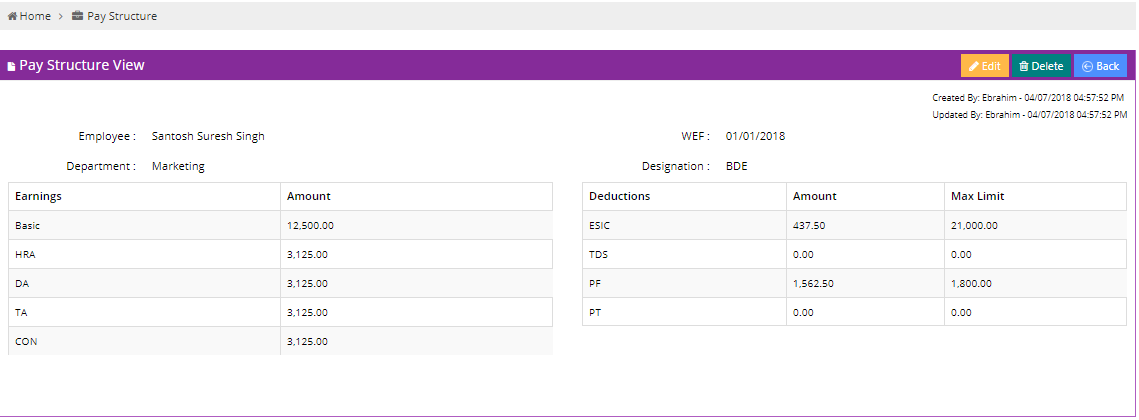
The following actions can be taken on a pay structure:
- Edit: To edit the pay structure, click on the Edit button. The user is prompted to enter a form. Once the form is filled, press the Save button to save the changes or the Cancel button to discard the changes made.
- Delete: To delete the pay structure of the selected employee, click on the Delete button.
- To go back to the previous screen, press the Back button.

9. Settings
This sub-module contains the payroll settings for employees.
Once the user clicks on Settings, eleven tabs are displayed to the user. These tabs represent different payroll settings. These are explained later.
9.1 Salary Components
The user can view the salary components settings in this section. A table displaying the current settings is shown. This table contains the following columns:
- Name: This column displays the Name of the salary component.
- Behaviour: This column displays the Behaviour of the component. This could be an earning or a deduction.
- Type: This column displays the Type of the salary component.
- Updated By: This column displays the User who updated the record.
- Updated On: This column displays the Time at which the record was updated.
- Action: This column displays the different actions that can be taken on a record.
The user can change the number of records per page and search for a particular record using the search bar.

9.1.1 Add New
To add a new salary component, click on the Add New button in the top right corner.
The user is then prompted to enter the details of the new salary component.
After entering the details, click Save to save the details and Cancel to cancel the changes.

9.1.2 Actions
The two actions are as follows:
- Edit: Edit allows the user to change the values of a record.
- Delete: Delete allows the user to remove a record from the list.

9.2 Payroll Template
The user can view the current payroll template in this section. The user can also modify or add a new template. A table displaying the current payroll templates is shown. This table contains the following columns:
- Name: This column displays the Name of the payroll template.
- Updated By: This column displays the User who updated the record.
- Updated On: This column displays the Time at which the record was updated.
- Action: This column displays the different actions that can be taken on a record.
The user can change the number of records per page and search for a particular record using the search bar.

9.2.1 Add New
To add a new payroll template, click on the Add New button in the top right corner.
The user is then prompted to enter the details of the new template.
After entering the details, click Save to save the details and Cancel to cancel the changes.

9.2.2 Actions
The four actions are as follows:
- Copy: Copy allows the user to generate a copy of an existing template.
- Edit: Edit allows the user to change the values of a record.
- Delete: Delete allows you to remove a record from the list.
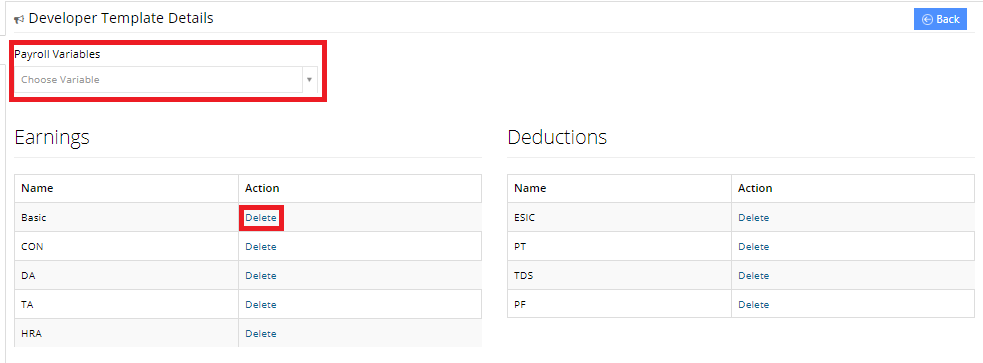
- View Template: When the user clicks on the View Template link, all existing payroll variables can be seen. These are divided into Earnings and Deductions. To delete a payroll variable, click on the Delete button next to the respective variable. You can add a new payroll variable by selecting it from the dropdown located in the top left part of the page.

9.3 Professional Tax
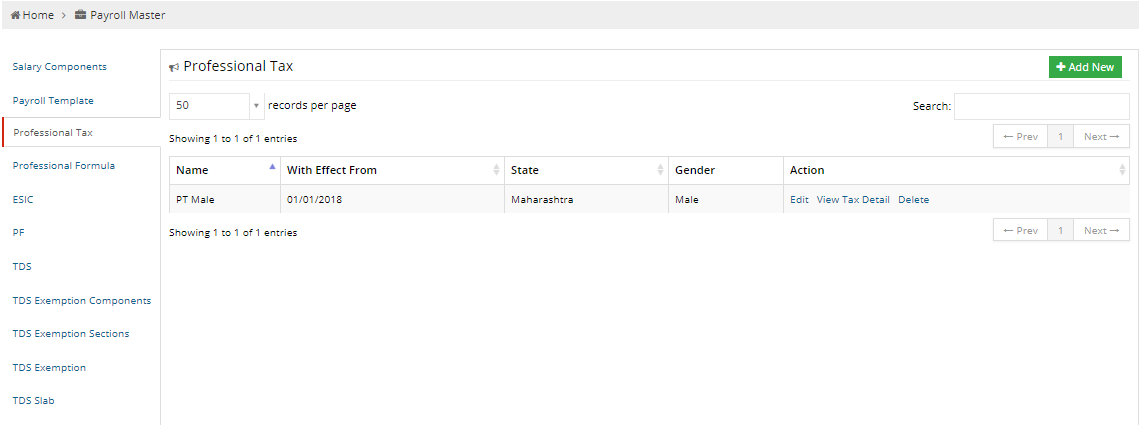
The user can view the professional tax details in this section. The user can also modify or add a new tax detail. A table displaying the current tax details is shown. This table contains the following columns:
- Name
- With Effect From: This column displays the date from which the tax is effective.
- State: This column displays the name of the State.
- Gender: This column displays the gender of the employee.
The user can change the number of records per page and search for a particular record using the search bar.
9.3.1 Add New
To add new professional tax details, click on the Add New button in the top right corner.
The user is then prompted to enter the details of the new record.
After entering the details, click Save to save the details and Cancel to cancel the changes.

9.3.2 Actions
The three actions are as follows:
- Edit: Edit allows the user to change the values of a record.
- Delete: Delete allows you to remove a record from the list.
- View Tax Detail: When the user clicks on the View Tax Detail link, all existing payroll variables can be seen. These are divided into Earnings and Deductions. To delete a payroll variable, click on the Delete button next to the respective variable. The user can add a new payroll variable by selecting it from the dropdown located in the top left part of the page.
To add a new record, click on the Add New button in the top right corner of the screen. Upon entering the details, press Save to save the new record.
Use the Edit button to change the values of a record and the Delete button to delete a record.


9.4 Professional Formula
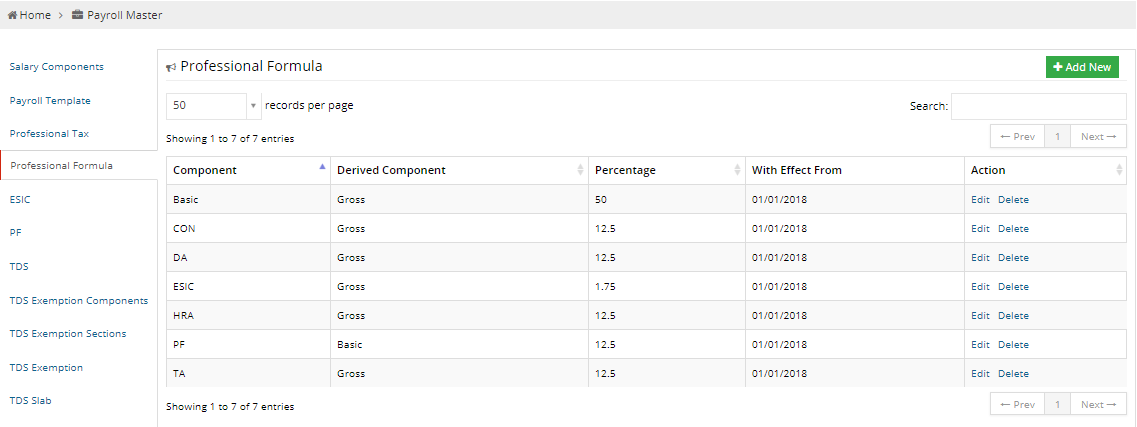
The user can view the professional formula details in this section. The user can also modify or add a new record. These formulae are used while creating the pay structure of an employee and does the calculation automatically based on the components selected. A table displaying the current details is shown. This table contains the following columns:
- Component
- Derived Component
- Percentage
- With Effect From
- Action
The user can change the number of records per page and search for a particular record using the search bar.
9.4.1 Add New
To add a new record, click on the Add New button in the top right corner.
The user is then prompted to enter the details of the new record.
After entering the details, click Save to save the details and Cancel to cancel the changes.

9.4.2 Actions
The two actions are as follows:
- Edit: Edit allows the user to change the values of a record.
- Delete: Delete allows you to remove a record from the list.

9.5 ESIC
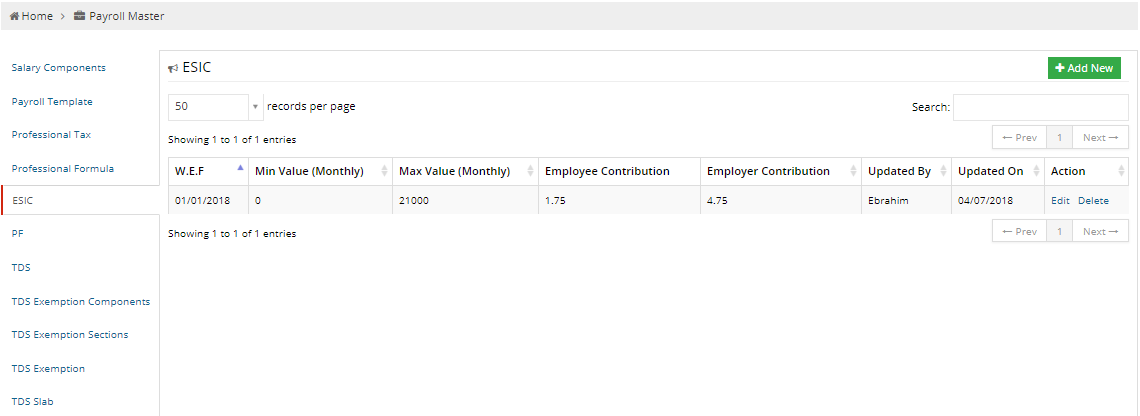
The user can view the ESIC details in this section. This formula will be used while calculating ESIC for the employees who are eligible for paying ESIC. The user can also modify or add a new record. A table displaying the current details is shown. This table contains the following columns:
- With Effect From
- Minimum Value (Monthly)
- Maximum Value (Monthly)
- Employee Contribution
- Employer Contribution
- Updated By
- Updated On
- Action
The user can change the number of records per page and search for a particular record using the search bar.
9.5.1 Add New
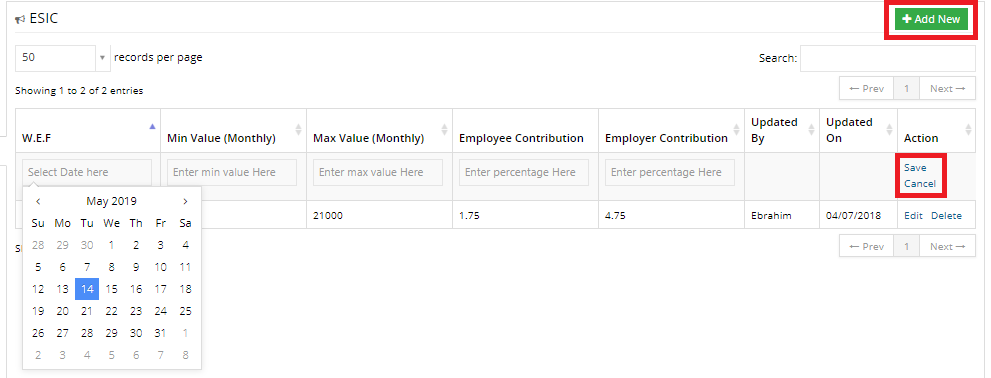
To add a new record, click on the Add New button in the top right corner.
The user is then prompted to enter the details of the new record.
After entering the details, click Save to save the details and Cancel to cancel the changes.
9.5.2 Actions
The two actions are as follows:
- Edit: Edit allows the user to change the values of a record.
- Delete: Delete allows you to remove a record from the list.

9.6 PF
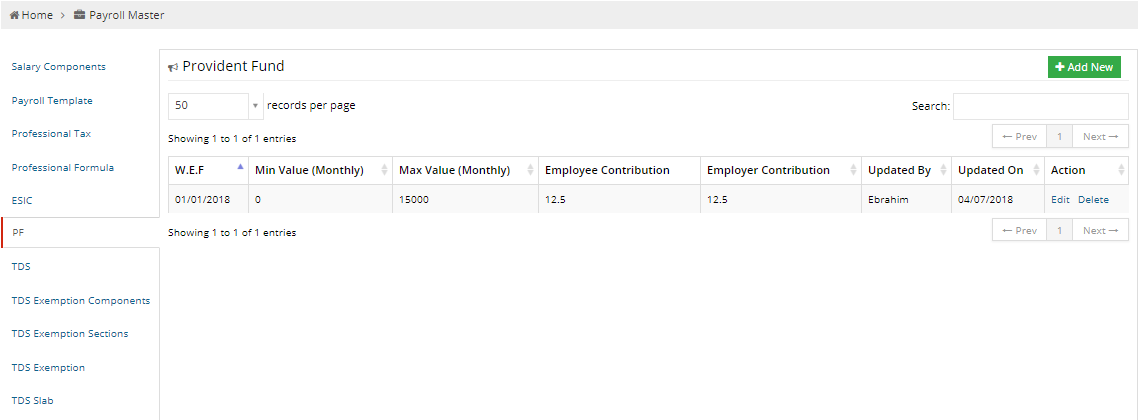
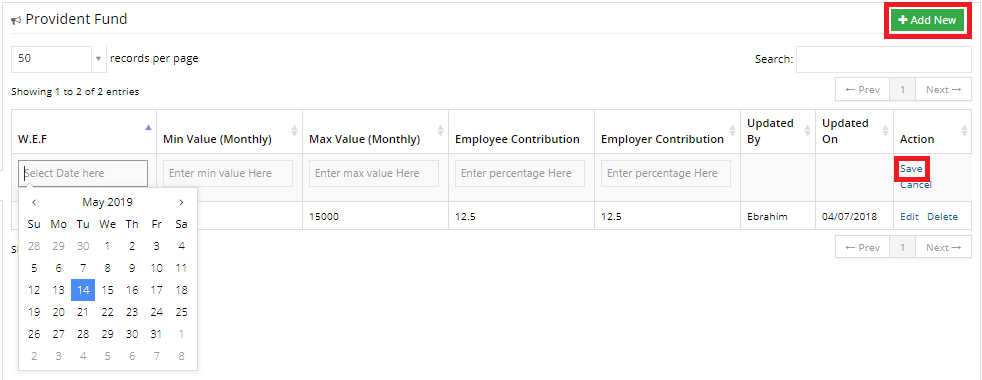
The user can view the Provident Fund details in this section. This defines the % contribution towards PF from Employee and Employer's side respectively. . The user can also modify or add a new record. A table displaying the current details is shown. This table contains the following columns:
- With Effect From
- Minimum Value (Monthly)
- Maximum Value (Monthly)
- Employee Contribution
- Employer Contribution
- Updated By
- Updated On
- Action
The user can change the number of records per page and search for a particular record using the search bar.
9.6.1 Add New
To add a new record, click on the Add New button in the top right corner.
The user is then prompted to enter the details of the new record.
After entering the details, click Save to save the details and Cancel to cancel the changes.
9.6.2 Actions
The two actions are as follows:
- Edit: Edit allows the user to change the values of a record.
- Delete: Delete allows you to remove a record from the list.

9.7 TDS
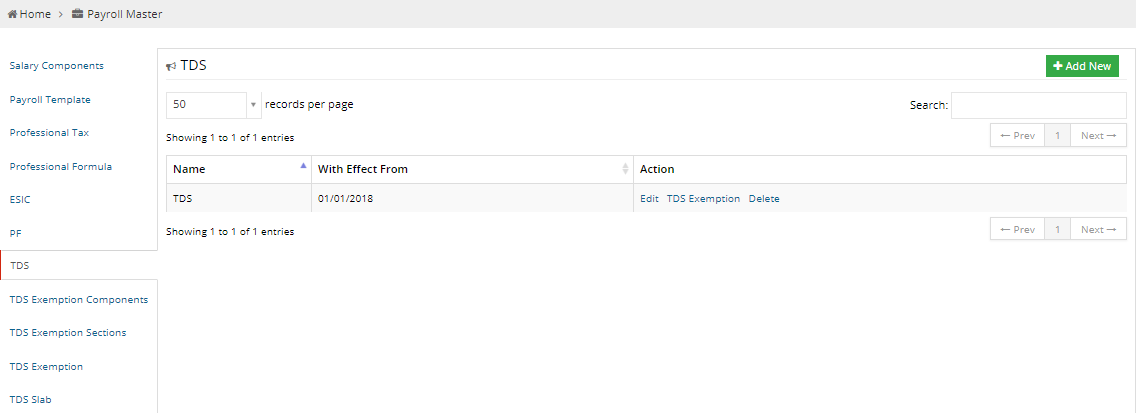
The user can view the TDS details in this section. This section defines the slabs and components which are exempted from TDS. The user can also modify or add a new record. A table displaying the current details is shown. This table contains the following columns:
- Name
- With Effect From
- Action
The user can change the number of records per page and search for a particular record using the search bar.
9.7.1 Add New
To add a new record, click on the Add New button in the top right corner.
The user is then prompted to enter the details of the new record.
After entering the details, click Save to save the details and Cancel to cancel the changes.

9.7.2 Actions
The three actions are as follows:
- Edit: Edit allows the user to change the values of a record.
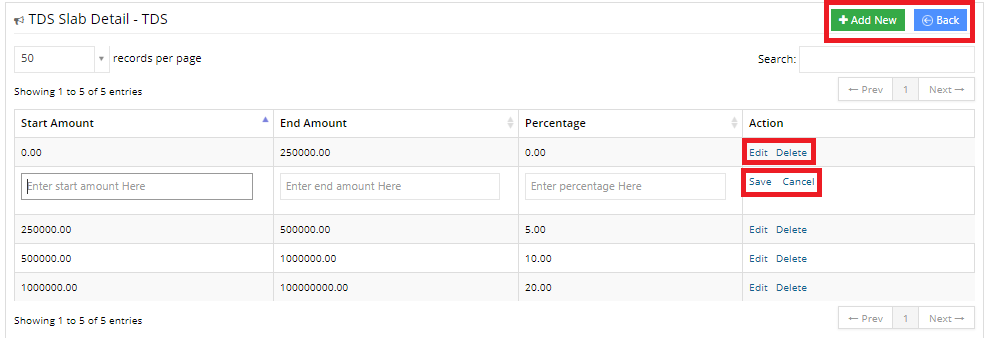
- TDS Exemption: When the user clicks on the TDS Exemption button in the Action column, all existing TDS details can be seen.
To add a new record, click on the Add New button in the top right corner of the screen. Upon entering the details, press Save to save the new record. To go back to the previous page, press the Back button.
Use the Edit button to change the values of a record and the Delete button to delete a record. - Delete: Delete allows you to remove a record from the list.


9.8 TDS Exemption Components
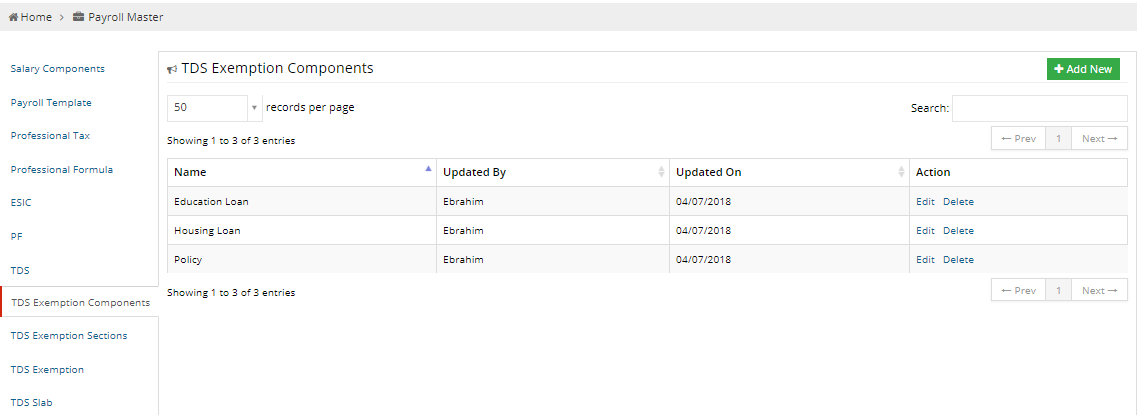
The user can view the TDS Exemption Components in this section. The user can also modify or add a new component. A table displaying the current components is shown. This table contains the following columns:
- Name of the Component
- Updated By
- Updated On
- Action
The user can change the number of records per page and search for a particular record using the search bar.
9.8.1 Add New
To add a new record, click on the Add New button in the top right corner.
The user is then prompted to enter the details of the new record.
After entering the details, click Save to save the details and Cancel to cancel the changes.

9.8.2 Actions
The two actions are as follows:
- Edit: Edit allows the user to change the values of a record.
- Delete: Delete allows you to remove a record from the list.

9.9 TDS Exemption Sections
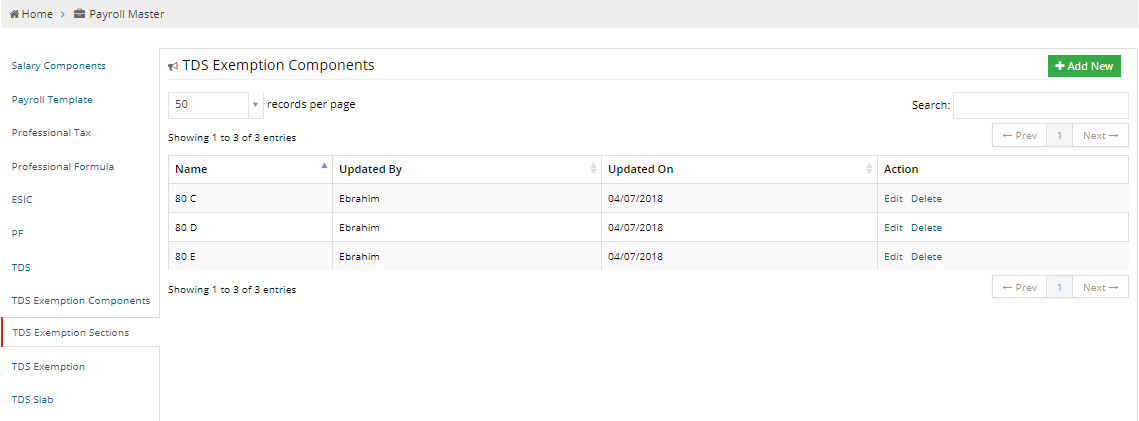
The user can view the TDS Exemption Sections in this section. The user can also modify or add a new section. A table displaying the current sections is shown. This table contains the following columns:
- Name of the Section
- Updated By
- Updated On
- Action
The user can change the number of records per page and search for a particular record using the search bar.
9.9.1 Add New
To add a new record, click on the Add New button in the top right corner.
The user is then prompted to enter the details of the new record.
After entering the details, click Save to save the details and Cancel to cancel the changes.

9.9.2 Actions
The two actions are as follows:
- Edit: Edit allows the user to change the values of a record.
- Delete: Delete allows you to remove a record from the list.

9.10 TDS Exemption
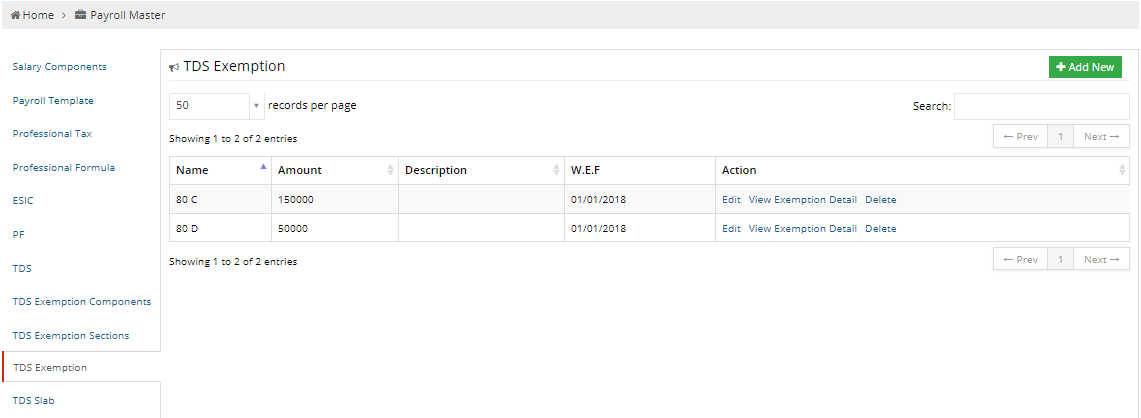
The user can view the TDS Exemption details in this section. The user can also modify or add a new record. A table displaying the current sections is shown. This table contains the following columns:
- Name of the Section
- Amount
- Description
- With Effect From
- Action
The user can change the number of records per page and search for a particular record using the search bar.
9.10.1 Add New
To add a new record, click on the Add New button in the top right corner.
The user is then prompted to enter the details of the new record.
After entering the details, click Save to save the details and Cancel to cancel the changes.

9.10.2 Actions
The three actions are as follows:
- Edit: Edit allows the user to change the values of a record.
- View Exemption Detail: When the user clicks on the View Exemption Detail link in the Action column, the user can see the TDS exception corresponding to each component.
To add a new record, click on the Add New button in the top right corner of the screen. Upon entering the details, press Save to save the new record. To go back to the previous page, press the Back button.
Use the Edit button to change the values of a record and the Delete button to delete a record. - Delete: Delete allows you to remove a record from the list.


9.11 TDS Slab
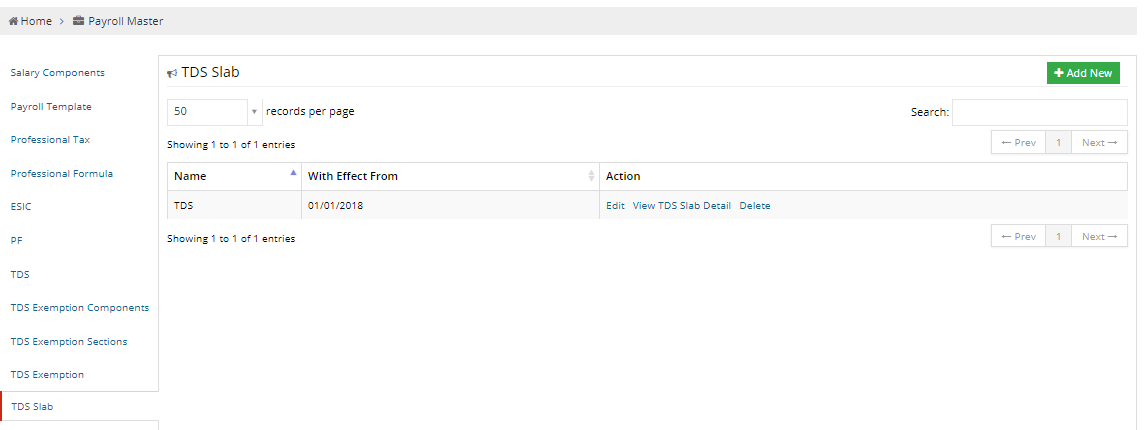
The user can view the TDS Slab details in this section. The user can also modify or add a new record. A table displaying the current sections is shown. This table contains the following columns:
- Name of the Section
- With Effect From
- Action
The user can change the number of records per page and search for a particular record using the search bar.
9.11.1 Add New
To add a new record, click on the Add New button in the top right corner.
The user is then prompted to enter the details of the new record.
After entering the details, click Save to save the details and Cancel to cancel the changes.

9.11.2 Actions
The three actions are as follows:
- Edit: Edit allows the user to change the values of a record.
- View TDS Slab Detail: When the user clicks on the View TDS Slab Detail link in the Action column, the user can see all the slabs of a particular record.
To add a new slab, click on the Add New button in the top right corner of the screen. Upon entering the details, press Save to save the new record. To go back to the previous page, press the Back button.
Use the Edit button to change the values of a slab and the Delete button to delete a slab. - Delete: Delete allows you to remove a record from the list.
