The AMC Complaint module of EdifyBiz is designed to help create and manage complaints against annual maintainance contracts of a company and provide statistics for the same. It is divided into three sub-modules:
- Complaint Dashboard
- Complaint
- Settings

1. Complaint Dashboard
This sub-module gives an overview and helps the user view statistics of different AMC Complaints. The user can also generate a pie chart or a bar chart to analyze the same.
The list contains of the following 3 sections
- Complaint Cards
- Charts
- Complaint List
1.1 Complaint Cards
Cards divide complaints into four different categories. Each card represents a different category. These four cards are as follows:
- Due Today: This displays complaints that are due today.
- Over Due: This displays all the complaints that are over due.
- Done Today: This displays complaints that have been done today.
- Assigned: This displays complaints have been assigned to an executive.

1.2 Charts
This section allows the user to generate charts to analyze different complaints.
The chart could be of two types, a Pie Chart and a Bar Chart. This can be selected using the charts dropwdown.

The user also has the option to select the top 10 complaints or all the complaints using the Chart Record dropdown.

The complaints assigned to a specific user can also be viewed using the user dropdown.

The date range of the chart can also be altered by clicking on the red dropdown in the top right corner.
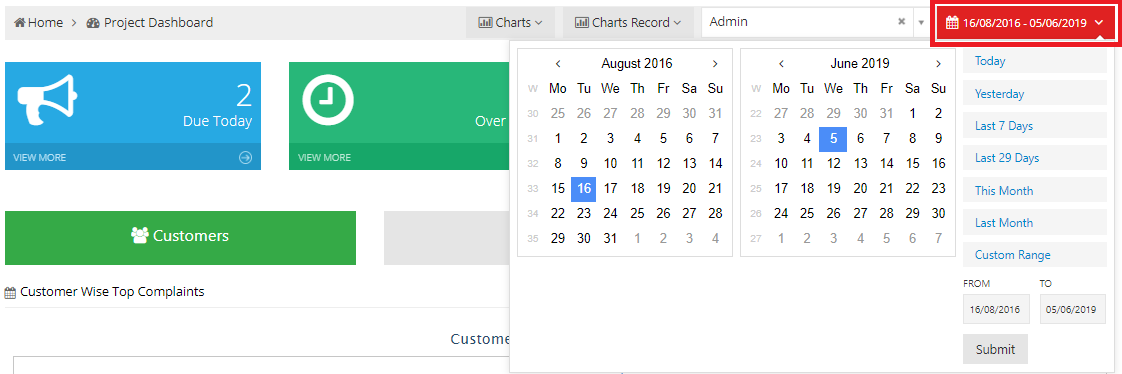
The chart can be drawn using either of the three points of view. These are as follows:
- Customer Wise
- Product Wise
- Executive Wise

Pie Chart:
A pie chart depicts slices corresponding to the selected parameter of the chart. For example: if customers is selected, the user can see slices corresponding to each customer.By clicking on any slice, the user can see a list of records corresponding to that slice.

Bar Chart:
A bar chart depicts bars corresponding to the selected parameter of the chart. For example: if customers is selected, the user can see bars corresponding to each customer.By clicking on any bar, the user can see a list of records corresponding to that bar.

2. Complaint
The user can view details about different AMC complaints and register a new complaint in this section.
2.1 Complaint List
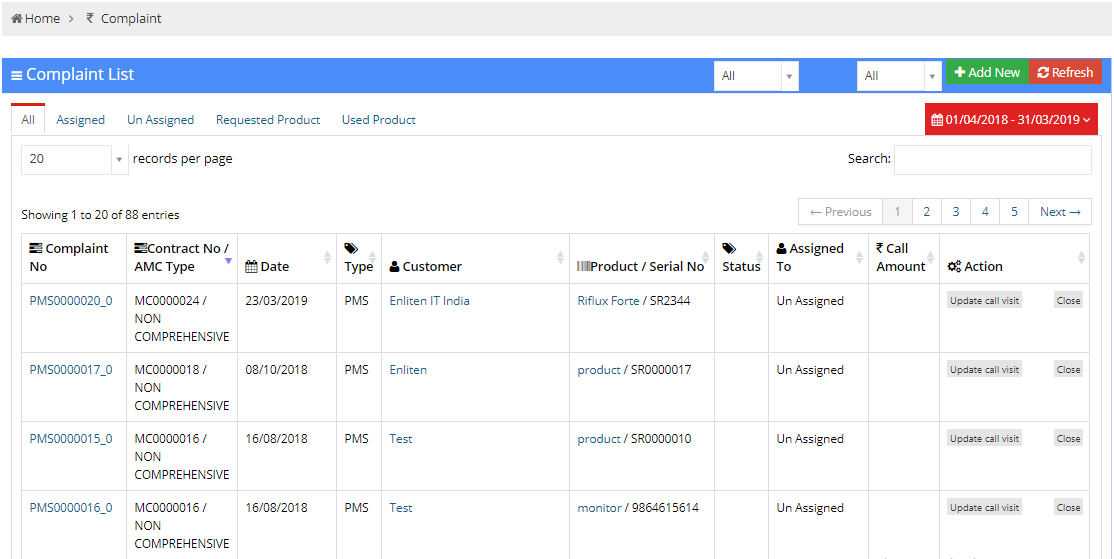
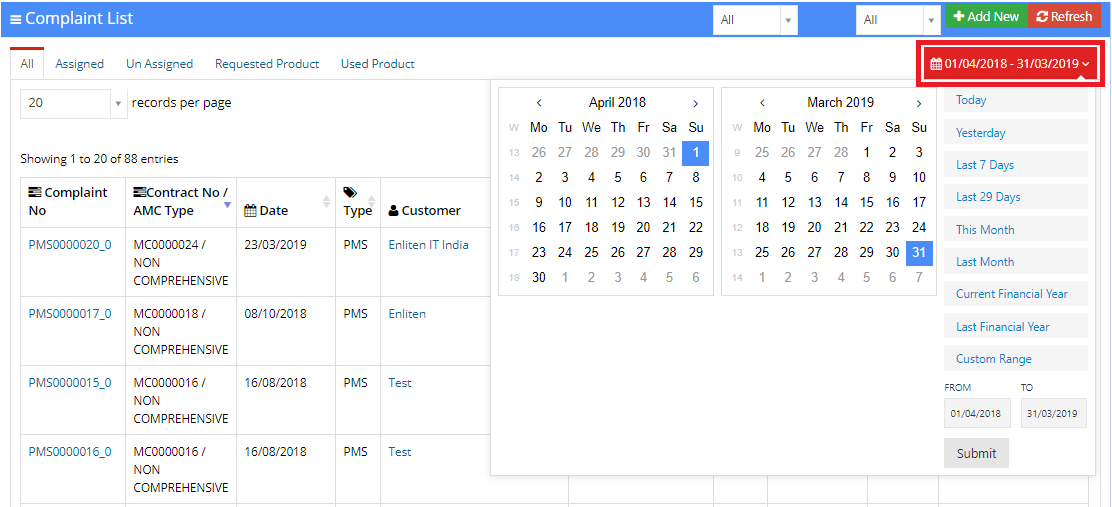
The user can view all complaints along with their details in the selected date range in this section.The user can alter the number of records per page or search for a specific record using the search bar.
All
This tab contains the list of all AMC complaints registered during the specified daterange.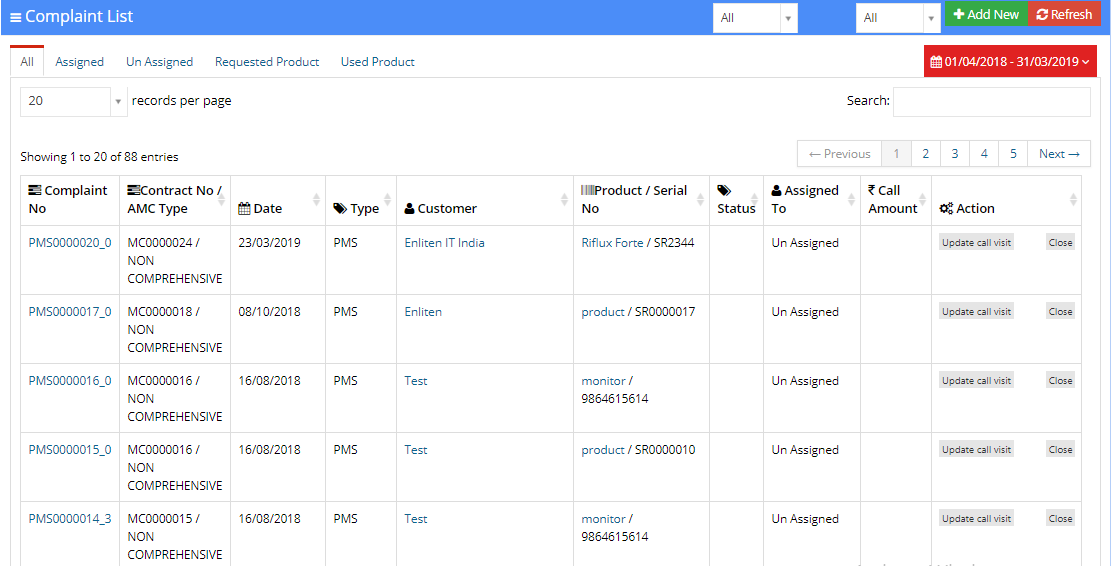
- Update Call Visit: This allows the user to update details about the call visit.
The user has is prompted to enter details about the visit. After this is done, the changes are saved when the user clicks on the Save button.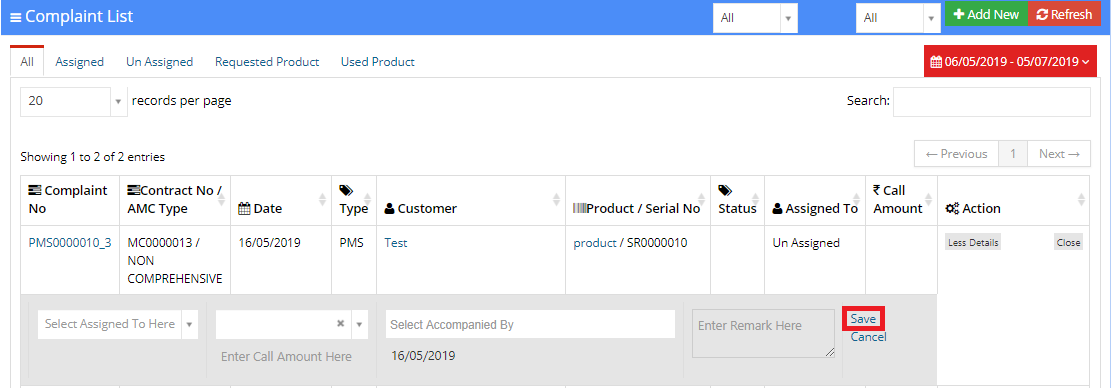
- Close: This enables the user to close a complaint after it has been resolved.

Assigned
This tab contains only the list of AMC complaints that have been assigned to an executive during the specified daterange.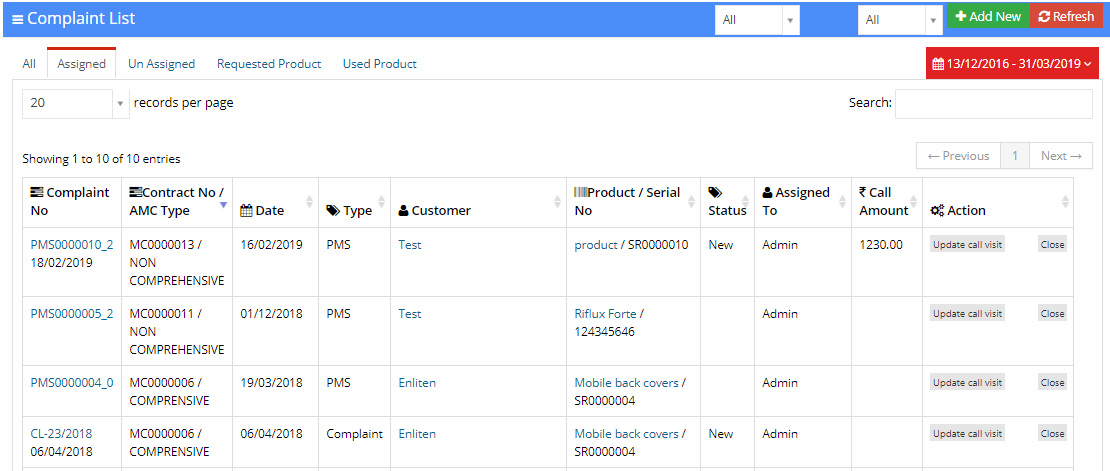
Unassigned
This tab contains only the list of AMC complaints that have not been assigned to any executive during the specified daterange.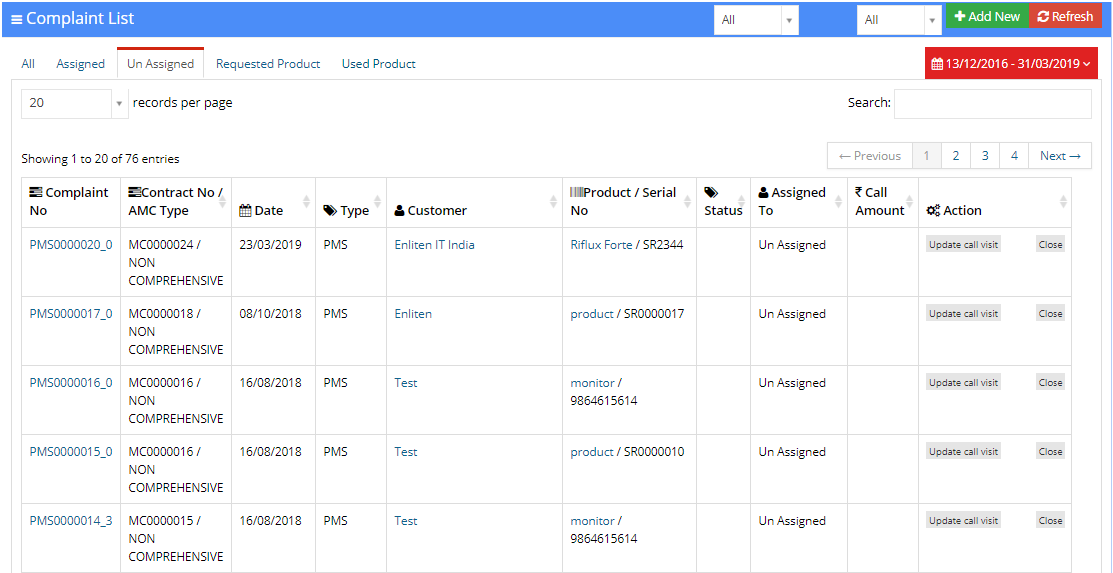
Requested Product
This tab contains the products requested by an executive during a service visit.
Used Product
This tab contains the products used during a service visit.
2.2 Add New
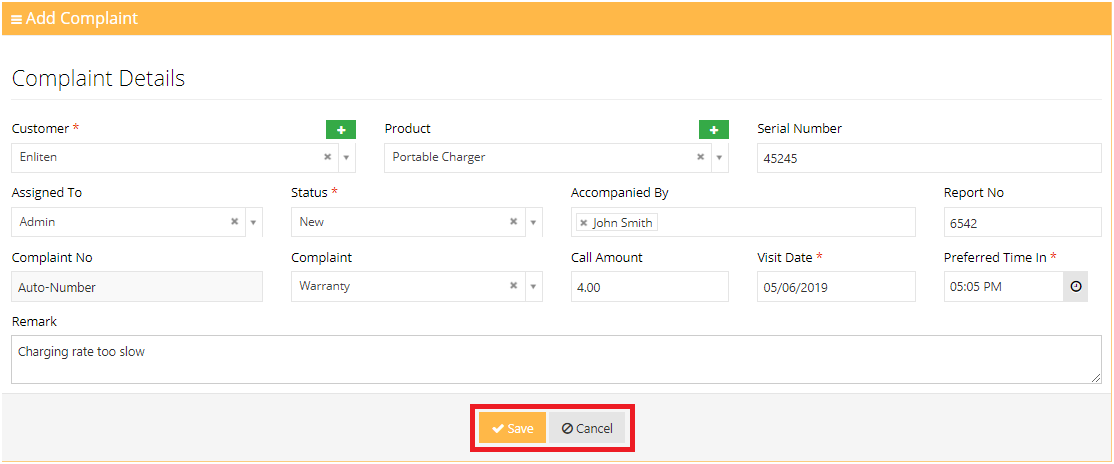
To register a new AMC complaint, click on the Add New button.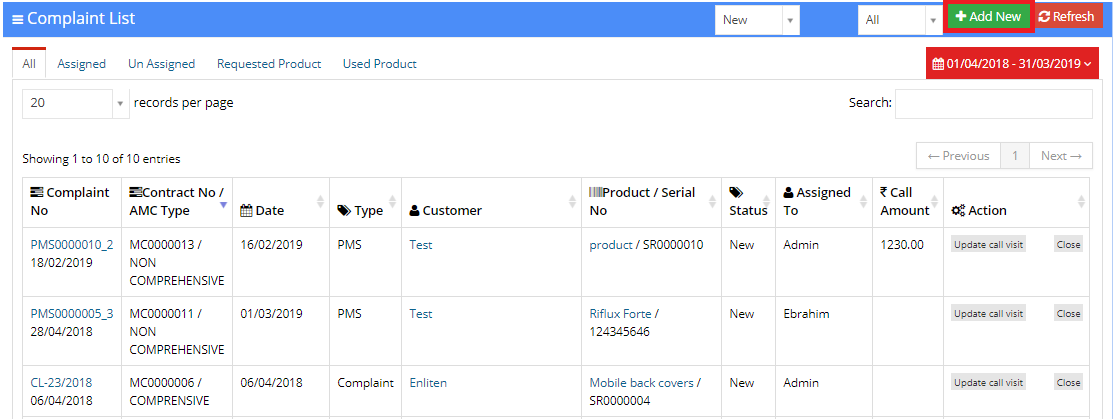
Fields marked with an asterisk(*) are required and can not be left empty.
The user is asked to fill enter the following fields:
- Walk-in Complaint: This type of complaint is made when a customer has not signed an AMC contract with the company. If this checkbox is ticked, the user is not prompted to enter fields regarding the AMC contract. (PMS Date, Contact Number and Complaint Number)
- Customer: This field asks the user to enter name of the customer.
- Product: This field asks the user select the product for which the complaint is to be registered.
- Serial Number: This field asks the user to enter the serial number of the product.
- PMS Date: This field stores the date at which the PMS visit was made. This field is only visible if the complaint is not a walk-in complaint.
- Contract Number: This field asks the user to enter the AMC contract number. This field is only visible if the complaint is not a walk-in complaint.
- Complaint Date: This field asks the user to enter the date of the complaint. This field is only visible if the complaint is not a walk-in complaint.
- Assigned To: The user can assign this complaint to an employee using this field.
- Status: The status of the complaint is stored in this field.
- Accompanied By: This field stores the name of the employee accompanying the executive.
- Report No: This field stores the report number.
- Complaint No: This field stores the complaint number, this is generally an automatically generated number.
- Complaint: This field stores the complaint of the customer
- Visit Date: This field stores the date of the visit.
- Call Amount: This field stores the amount spent in making the call.
- Preferred Time In: This field stores the preferred time of the visit.
- Remark: The user can add additional remarks to the complaint in this field.

2.3 Complaint View
The Complaint View shows the user all the details about the complaint. Additional actions can also be taken on a complaint in this module.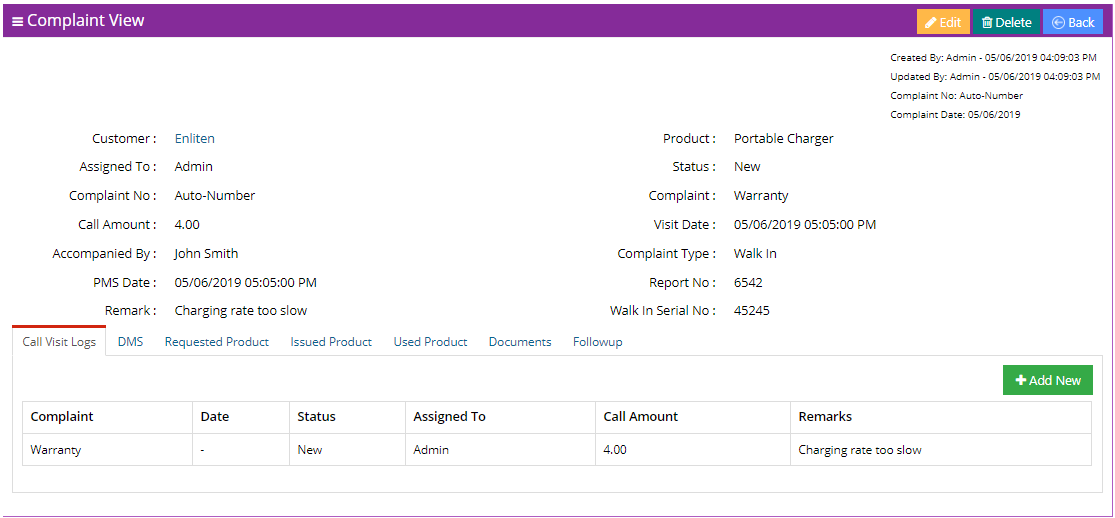
2.3.1 Actions
The following actions can be taken on a contract:- Edit: To edit the complaint details, press the Edit button.
The user is then prompted to fill a form asking for the new details of the complaint. After entering all the details, press the Save button to save the changes. Press the Cancel button to go back to the view after discarding the changes.
- Delete: To delete the record of the complaint, press the Delete button.
- Back: To go back to the Contract List, press the Back button.

2.3.2 Tabs
The user can add additional information to the complaint using different tabs of this section. They are as follows:Call Visit Logs
The user can view the details of call visits in this tab. All added details of call visits can also be seen here.

DMS
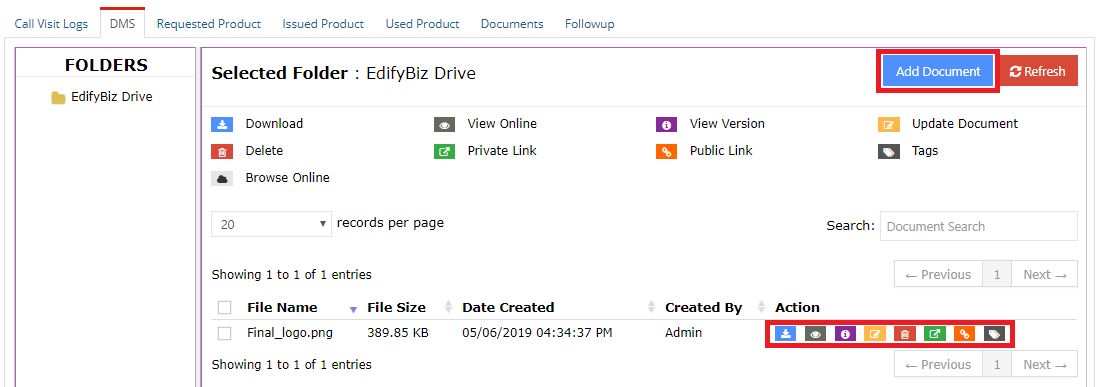
The user can attach additional documents to a complaint using Edifybiz's DMS functionality.
To add a new document, the user can click on the Add Document button and refresh the list of added documents by clicking on the Refresh button.
The user can navigate through different folders in the Folders column.
The details of a document include the File Name, the Size of the File, the Date of Creation and the user who created the document.
The actions that can be taken on a document include:
- Download: To download the document.
- View Online: This opens the document in a new tab.
- View Version: Allows the user to view previous versions of the document.
- Update Document: Allows the user to revise or update a document.
- Delete: Enables the user to delete a document.
- Private Link: This generates a link to the document. This document is password protected.
- Public Document: This generates a link to the document which can be viewed by anyone who posseses the link.
- Tags: This enables the user to add a tag to the document.
Requested Product
This tab displays the list of products requested by the executive during a call visit.
To add a product to the requested product list, press the Add New button.
After entering the details about the requested product, press Save to add it to the list. Pressing Cancel will discard the changes.

- Edit: To edit the values of a record, press Edit in the Action column.
- Delete: To delete a record, press Delete in the Action column.

Issued Product
This tab displays the list of products issued to an executive for a call visit. Each record contains the user issuing the product as well as the one to which the product was issued.
To add a product to the requested product list, press the Add New button.
After entering the details about the requested product, press Save to add it to the list. Pressing Cancel will discard the changes.

- Edit: To edit the values of a record, press Edit in the Action column.
- Delete: To delete a record, press Delete in the Action column.

Used Product
This tab displays the list of products used during a call visit.
To add a product to the used product list, press the Add New button.
After entering the details about the requested product, press Save to add it to the list. Pressing Cancel will discard the changes.

- Edit: To edit the values of a record, press Edit in the Action column.
- Delete: To delete a record, press Delete in the Action column.

Documents
In this section, the user can upload and view different uploaded documents
The user can navigate through different folders in the Folders column on the left.
Once a folder is selected, the user can view the documents that exist in that folder.
The user can generate a link to the document by clicking on the Get Link button.
To get an overview of a document, the user can click on the name of the document.
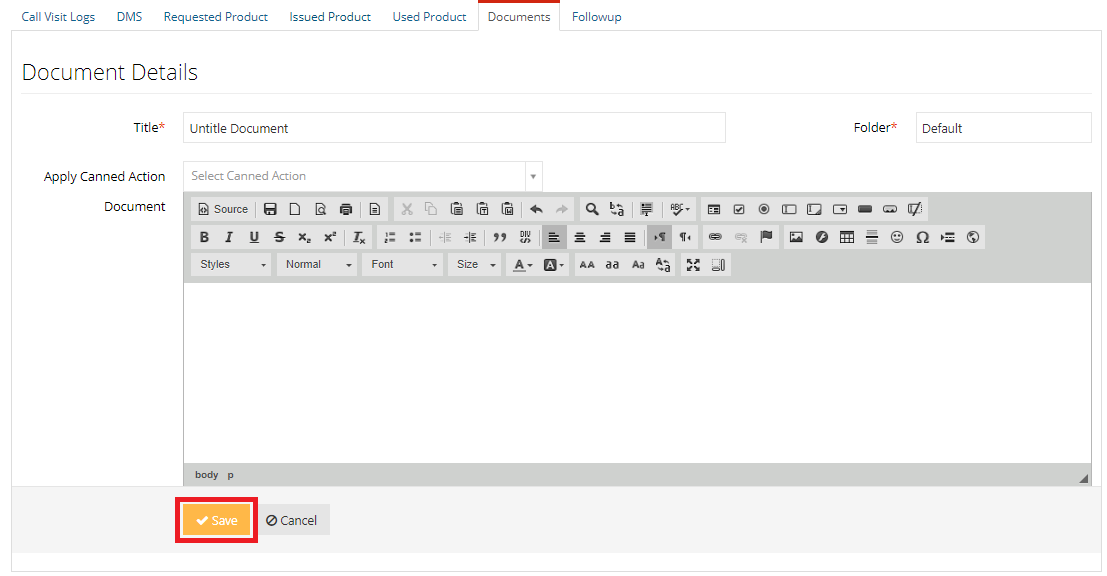
To add a new document to the selected folder, the user can click on the Add New button.

When the user clicks on the Add New button, the user is prompted to enter the document details. These details include the Document title, the Folder and Apply Canned Action.
Use Apply Canned Action to generate a document in accordance to a set template.
The user then is able to format the document using the CK Editor.
Upon finishing the above procedure, the user can press the Save button to save the document or cancel the document and go back to the previous screen by pressing the Cancel button.
After clicking on the name of a document, the user can see a preview of the document
Various actions can be taken on the document. These include:
- Mail the document to someone else.
- Revise the document.
- Delete the document.
- Edit the document.
- Print the document.

Follow Up
The user can create a followup and view previous followups in the tab. The user can add a Contact, Company Person and Product in the Follow Up.
To create a new follow up, the user can click on the Add New button and refresh the list of added follow ups by clicking on the Refresh button.

3. Settings
This sub-module is divided into the following sections:
- Complaint Type
- Plan
3.1 Complaint Type
This section allows the user to set default complaint types that can be used while registering a complaint.Already added complaint types are listed.


3.2 Plan
This section allows the user to set plans that can be used while creating a contract.Already added plans are listed.


